LPIC 305 Vagrant
Starting this series of posts related to the new LPIC-305 Virtualization and Containerization exam, we will be exploring Vagrant a development environment tool that allows a sysadmin or developer create a ready-to-use virtual environment. Vagrant is a HashiCorp, the same company that gave use Terraform, Vault, Packer, Consul, Nomad and other wonderful tools that facilitate our life.
So, how it works …
How Vagrant works ?
Vagrant basically manages the lifecycle of a virtual machine, being this VM from providers like HyperV, VirtualBox, Libvirt, Parallels, VMWare or even LXC in some cases, the list is huge. It does that my leveraging the use of a Box, which is a complete pre-installed system. This system can be a GNU/Linux machine, Windows or even a MacOS, not only that you can also have customized Boxes. Let’s say you want a classic LAMP environment read for use by your developers or a Kubernetes Cluster Box ready for some testing. You could simply create this box with every single piece of software that you want, close it, and let available for users.
Normally you will find a huge variate of Boxes in the app.vagrantup.com/boxes/search address. If you are already familiar with Docker registries like Docker Hub is the same idea, but in this case Vagrant will manage a provider and a specific box for that provider.
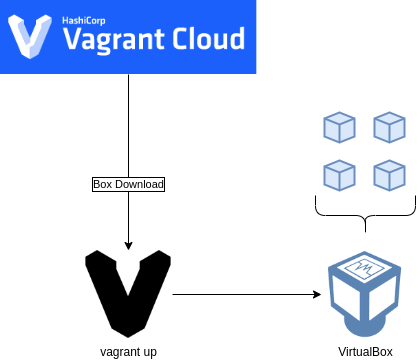
So, in the image above you see part of the Vagrant lifecycle where starting from a command like vagrant up or vagrant box add, that we will understand later in this post, a Box will be downloaded from Vagrant Cloud, kept locally and than based in a configuration file Vagrant will start to manage a provider, in this case VirtualBox, in order to deploy this new system. Keep in mind that not every single Box has support for all the providers available, for HyperV for example you will not find, by the moment I am writing this post, a updated version of a Ubuntu, Debian or even CentOS box.
So what should we learn for the LPIC-305
Let’s take a look on the topics related to Vagrant in the LPIC-305.
From the LPIC-305 wiki page:
**Weight**:	3
**Description**: Candidate should be able to use Vagrant to manage
virtual machines, including provisioning of the virtual machine.

**Key Knowledge Areas**:

- Understand Vagrant architecture and concepts, including storage
  and networking
- Retrieve and use boxes from Atlas
- Create and run Vagrantfiles
- Access Vagrant virtual machines
- Share and synchronize folder between a Vagrant virtual machine
  and the host system
- Understand Vagrant provisioning, i.e. File and Shell provisioners
- Understand multi-machine setup

**Partial list of the used files, terms and utilities**:

- vagrant
- Vagrantfile
In the Key Knowledge Areas we have the first 4 items that are really simple and easy to cover. The others aren’t that much complicated but they carry extra steps and configuration that you need to pay attention when working with Vagrant.
So , let’s start with the simple ones and gradually start covering the other with more complexity.
Basic use of Vagrant
First and foremost, you need to have Vagrant and VirtualBox installed in your OS being it a GNU/Linux, Windows or MacOS so go figure it out…kidding, for most GNU/Linux distros you just need to use you package management tool or download the .rpm or .deb from their websites. On Windows just go to the download page on each website to get your version and for MacOS users you can use HomeBrew and install both tools.
Now, we need a space for our mess. In your preferable OS flavor, create a directory for holding our configurations files and from where we are going to run some Vagrant commands. For Windows users a strongly recommend using something in the C:\, CLI are NOT the strong thing on Windows and if you have some spaces or accents in your username your vagrant up command may fail.
$ mkdir lpi305lab
$ cd lpi305lab
lpi305lab$
The first step in using Vagrant is the init phase. If you just type vagrant init it will create a simple Vagrantfile which is the configuration file for all Vagrant actions in this directory. This file right now have some examples and options that you can enter in your Vagrantfile.
|
|
If you carefully read this configuration you will already understand how Vagrant works, but lets start in a more step by step approach. Remove this, file if you create it, and now run again the same command but with the -m option, creating than a minimal version of this Vagrantfile.
|
|
Minimal version of a Vagrantfile:
lpi305lab$ cat Vagrantfile
Vagrant.configure("2") do |config|
  config.vm.box = "base"
end
Now we only have the box definition, and we need to change it to a valid box name. To mention some boxes that I use:
- debian/buster64: Debian 10 (Buster)
- debian/stretch64: Debian 9 (Stretch)
- centos/8: CentOS 8
- centos/7: CentOS 7
- ubuntu/focal64: Ubuntu 20.04 LTS
- ubuntu/bionic64: Ubuntu 18.04 LTS
- ubuntu/xenial64: Ubuntu 16.04 LTS
Sometimes a need to use a mix of those and also older ones for testing different environments, for example, upgrade a MongoDB from series 3.x to 4.x service in a Ubuntu 16.04. Change the base box in your Vagrantfile and use of the items above:
lpi305lab$ cat Vagrantfile
Vagrant.configure("2") do |config|
  config.vm.box = "ubuntu/focal64"
end
Now, from the same directory run vagrant up and wait for this machine to start.
lpi305lab$ vagrant up
...
...
...
lpi305lab$ vagrant status
Current machine states:

default                   running (virtualbox)

The VM is running. To stop this VM, you can run `vagrant halt` to
shut it down forcefully, or you can run `vagrant suspend` to simply
suspend the virtual machine. In either case, to restart it again,
simply run `vagrant up`.
We can access this machine which the vagrant ssh command and star using our virtual machine.
lpi305lab$ vagrant ssh
Welcome to Ubuntu 20.04.2 LTS (GNU/Linux 5.4.0-66-generic x86_64)

 * Documentation:  https://help.ubuntu.com
 * Management:     https://landscape.canonical.com
 * Support:        https://ubuntu.com/advantage

  System information as of Sat Mar 13 19:22:11 UTC 2021

  System load:  0.0               Processes:               110
  Usage of /:   3.2% of 38.71GB   Users logged in:         0
  Memory usage: 20%               IPv4 address for enp0s3: 10.0.2.15
  Swap usage:   0%


1 update can be installed immediately.
0 of these updates are security updates.
To see these additional updates run: apt list --upgradable


vagrant@ubuntu-focal:~$
Storage and Network
With our machine up and running we can explore how Vagrant deals with Network and Storage. First thing, Vagrant will always manage the provider features and resources so it is limited by which provider you are using. Taking Virtualbox for example, when dealing with network you have a lot of options like: NAT Network, NAT, Bridge, Internal, Host-only. But when using Vagrant you have a private_network and public_network definition, with some options that allows you manipulate things like DHCP, port forwarding and also define the NIC you will be using in you bridge environment.
Lets create a new network definition for our environment:
lpi305lab$ cat Vagrantfile
Vagrant.configure("2") do |config|
  config.vm.box = "ubuntu/focal64"
  config.vm.hostname = "focal"
  config.vm.network "private_network", ip: "192.168.200.200"
end
This configuration will set our virtual machine hostname, meaning /etc/hosts defining the name used in the loopback interface. It will also define our network as private, with will isolate this machine in a virtual network restricted to you host only.
Just restart the virtual machine with the sequence vagrant halt && vagrant up and than check the configurations:
vagrant@ubunutfocal:~$ cat /etc/hosts
127.0.0.1	localhost

# The following lines are desirable for IPv6 capable hosts
::1	ip6-localhost	ip6-loopback
fe00::0	ip6-localnet
ff00::0	ip6-mcastprefix
ff02::1	ip6-allnodes
ff02::2	ip6-allrouters
ff02::3	ip6-allhosts
127.0.1.1	ubunutfocal.example.com	ubunutfocal

vagrant@ubunutfocal:~$ hostname -I
10.0.2.15 192.168.200.200
Growing your Lab
Now that we know how to run one single VM, let me expand this lab so that you can create a small network of VMs. Because Vagrant was written in Ruby the Vagrantfile also support a lot of resources from this language, so that we can use dictionaries and lists in our advantage in order to bring small VM definitions that are going to be used to create out virtual environment.
Before anything, destroy your current lab with vagrant destroy command. And the configure you Vagrantfile as follow:
|
|
This new configuration will create 2 machines in the same network running Ubuntu and CentOS, each one with your on hostname configuration based in the key element in the vms dictionary. The vms.each is a loop that will go through the vms getting its name (key) and conf (value) and applying those to the now deployed virtual machine.
The main instruction here is the config.vm.define which allow us to use Multi-Machine definition to create a environment with multiple VMs. The same Vagrantfile could be written like following:
|
|
Syncing Folders with your Lab
Another nice feature that Vagrant give us is syncing folders with our labs. Basically we are already doing this without knowing, Vagrant will always sync your current folder, the one you have you Vagrantfile and run your vagrant commands, with you each virtual machine under the path /vagrant/:
lpic305lab$ vagrant ssh vm1
Welcome to Ubuntu 20.04.2 LTS (GNU/Linux 5.4.0-66-generic x86_64)
* Documentation: https://help.ubuntu.com
* Management: https://landscape.canonical.com
* Support: https://ubuntu.com/advantage
System information as of Wed Mar 17 01:31:12 UTC 2021
System load: 0.0 Processes: 111
Usage of /: 3.2% of 38.71GB Users logged in: 0
Memory usage: 19% IPv4 address for enp0s3: 10.0.2.15
Swap usage: 0% IPv4 address for enp0s8: 192.168.200.200
1 update can be installed immediately.
0 of these updates are security updates.
To see these additional updates run: apt list --upgradable
vagrant@vm1:~$ ls /vagrant/
Vagrantfile
vagrant@vm1:~$ cat /vagrant/Vagrantfile
Vagrant.configure("2") do |config|
  config.vm.define "vm1" do |this|
    this.vm.box = "ubuntu/focal64"
    this.vm.hostname = "vm1.example.com"
    this.vm.network "private_network", ip: "192.168.200.200"
  end

  config.vm.define "vm2" do |this|
    this.vm.box = "centos/8"
    this.vm.hostname = "vm2.example.com"
    this.vm.network "private_network", ip: "192.168.200.201"
  end
end
vagrant@vm1:~$
We can also sync other directories by using the config.vm.synced_folder instruction in our Vagrantfile like the following:
|
|
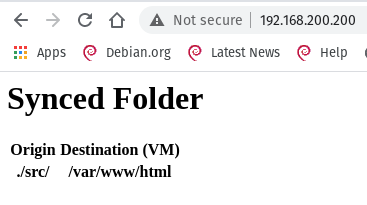
Now create this src folder the same place you have you Vagrantfile, and them add a index.html file with the content:
|
|
Then use the vagrant reload vm1 to re-sync this folder. After that ssh in the vm1 and install Nginx. Then try to open the address 192.168.200.200 in you browser to see if the index.html from your src/ folder got rendered, like the one bellow:
You will probably receive a error after running vagrant reload in vm2. That’s because VM2 as a CentOS 8 that doesn’t have VirtualBox Guest Additions package installed. I will not cover this step at this moment.
For more options about syncing folder try to look here
Provision
Another aspect of Vagrant is the capacity of running a great deal of provisioning solutions, like Puppet, Ansible, Chef, Salt, CFEngine and ShellScrip. You also have some options in the container realm, at the moment Podman and Docker. I will cover the use of File and Shell Scripting provision, but I highly recommend to take a look at Chef,Ansible and Puppet.
Provision normally run when the VM is being built so if we want to force this processes with our already created VMs we should instead use the provision argument. We are going to run some examples so don’t worry.
Provisioning with File
File provisioning is a simple way to copy your local files to a certain destination in you Vagrant VM. For instance:
|
|
This is going to have the same result as the sync method we used previously. Lets change it in out Vagrantfile and test.
|
|
Now you just need to run vagrant provision, this will start the provisioning step that we created. Always use this command if you want to rerun you provisioning phase.
This will lead to a error:
|
|
Has the message said we do not have permission to copy this content to the /var/www/html folder. That’s because the steps inside the VM are running with the vagrant user and this destination folder is managed by the root account. From the Vagrant documentation:
The file uploads by the file provisioner are done as the SSH or PowerShell user. This is important since these users generally do not have elevated privileges on their own. If you want to upload files to locations that require elevated privileges, we recommend uploading them to temporary locations and then using the shell provisioner to move them into place.
So let’s move to our next step and create a second provisioning step that will move this content to the right place.
Provisioning with Shell Script
Shell Script is THE language in the UNIX or GNU/Linux environment, everyone working or studding Linux should take it seriously and if not started yet I will strongly recommend you do … :) .
You basically have 2 options for provisioning with Shell Script: inline or path. The first you’ll define you script inside the Vagrantfile whilst the other will run a external script, being it in you host or in a URL. Let’s explore the first, make the following changes to your Vagrantfile:
|
|
And run again vagrant provision:
lpic305lab$ vagrant provision
==> vm1: Running provisioner: file...
    vm1: src/. => /tmp/htmlsrc
==> vm1: Running provisioner: shell...
    vm1: Running: inline script
==> vm2: Running provisioner: file...
    vm2: src/. => /tmp/htmlsrc
==> vm2: Running provisioner: shell...
    vm2: Running: inline script
Now you’ll have both machines it the index.html provisioned by the File and Shell Script method. But let’s say you want to pass some argument to each script so that you could have some customization in you index.html. For this we’ll neeed to change your script provision step a little bit.
config.vm.provision "shell" do |shell|
  shell.inline = 'echo "<h1>This is machine $1</h1>" > /var/www/html/index.html'
  shell.args = ["$(hostname)"]
end
What this piece of code is doing is create a new index.html inside you /var/www/html/ folder but now with the hostname generated by the sub shell passed as argument. One important information is present here, Vagrant will run this shell and the arguments inside the VM and not in the host system, leading to each having your on customized index.html file.
Let’s complement this example using a external shell that will guarantee the Nginx installed in each machine. This script will be called externally using the path method, so in a new file named install_nginx.shand past the content that follow:
|
|
And we have to upgrade our Vagrantfile with some changes:
|
|
This way we are going to have a shell to install Nginx according to the distro we are using on each machine and also a inline step that will change the configuration.
So, this is the end of this part of my preparation to the LPIC-305 v3 Virtualization and Containerization related to the Vagrant topic. Of course, there are other solutions for doing the same thins, for example, you could use a Docker and Docker-Compose and get to the same result, and even talking about virtual machines you have Packer for customizing your cloud images. Nevertheless, this was about Vagrant environment with a small part of this exam, so do not skip it.
Thanks by reading :)